
Tutorials are now available: {Part 1 – simple car} here and {Part 2 – larger truck} here.
Last week I was expecting to make one vehicle for the little man out of a nappy box (diaper box). That vehicle was a bulldozer with a moving blade.

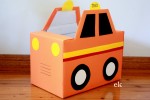
But as soon as he had finished admiring it, he requested a dump truck. I hadn’t planned to make a dump truck – aesthetically it would need to be much larger than the bulldozer for the little man to still fit into the cab and have the tray (bed) proportionate. But I agreed (it was an easier request than a cement mixer afterall). The tray may be disproportionately small but it dumps.

Then he requested a bus which he sat in the entire time I was making it, giving me instructions.

The bus is made from one and a half boxes, the other half was added onto the fire engine.

So we needed the other emergency vehicles, firstly the ambulance.

Then the police car.

I had been planning to make about six of these box vehicles, thinking I may might make one every week or so for our next theme on different people. But this far through construction I decided I would finish the last two vehicles. The post van,

And the delivery truck (what better to deliver than cupcakes?!)

I’m now out of nappy boxes (I’m not sure if this is a good or a bad thing) so perhaps now I should make a petrol pump (gas pump) to keep all these vehicles going.
xo

October 10, 2012 at 9:59 pm
Em, these are amazing! I am in awe of you. 🙂
October 25, 2012 at 3:57 pm
these are amazing. I hope you have a 3-4 car garage to store them all!
August 15, 2013 at 5:22 am
Do you have the instructions on how you made these?…what size boxes, etc? I would love to see instructions and step by step pictures of how you created each of these.
August 16, 2013 at 2:09 pm
Thanks, glad you like them. Hubby has just thrown out my stash of diaper boxes – I will add a tutorial once I manage to collect another one or two. xo
August 27, 2013 at 9:42 pm
A tutorial is now available, there is a link in the original post. xo
August 16, 2013 at 8:12 am
Do you have the directions on how to make these? Or step by step pictures?
August 16, 2013 at 2:09 pm
Thanks, glad you like them. Hubby has just thrown out my stash of diaper boxes – I will add a tutorial once I manage to collect another one or two. xo
August 27, 2013 at 9:42 pm
A tutorial is now available, there is a link in the original post. xo
August 16, 2013 at 2:08 pm
Mama Carmody and Jen, I haven’t put up any directions but if you bear with me I will happily provide some as soon as I can {update: tutorial now available}. xo
August 29, 2013 at 2:47 am
Hi,
I’m doing a round-up of DIY projects to do with a diaper box on Disney Baby and wondered if I could include yours. I’d use on photo with credit and link back to your full post. Is that okay?
Thanks!
Janssen
everyday-reading.com
August 29, 2013 at 8:22 pm
Of course, I’m glad you like them. Thanks for asking, Em xo
September 5, 2013 at 1:06 pm
Thanks! Here’s the finished post, if you’d like to check it out: http://www.disneybaby.com/blog/20-diaper-box-diy-projects/
September 5, 2013 at 8:10 pm
Of course – plenty of boxes here that need a more noble purpose! Thanks xo
November 8, 2013 at 11:07 am
hi i was wondering if you could give me the instructions for how you put together the ambulance you have in the picture. I am a pre-k teacher and their socio-dramatic play center is a hospital. I would love to make this for them
November 8, 2013 at 1:33 pm
Thanks, I am glad that you like them. There is a general tutorial here: https://keriene.wordpress.com/2013/08/27/car-box-tutorial-part-1-simple-car/ . For the ambulance, I left the back flap vertical, taped the front flap to be horizontal, trimmed the side flaps then taped the remaining parts to be vertical and added extra cardboard for a windshield. The windows, sirens, stripes, lights and wheels are made of cardboard and glued or taped on, and the back doors and front grille are drawn on. If there are more questions you have I am happy to try and answer them but I hope that gives you something to start with. xo
March 28, 2014 at 8:23 am
Hi, I was wondering if you could give me a quick tip on making the back of the dump truck movable? I am trying to figure that out. Thanks
March 31, 2014 at 8:06 pm
Hi Esther, I’m happy to try. You basically want to make a hinge at the back of the truck so that the tray is able to lift but stays attached to the frame underneath only along the back. One possibility is a piece of cardboard folded in half and attached the tray to the bed with the fold along the back of the truck. Another possibility a cylinder (dowel, straw, toothpick, cardboard tube) which goes through both the bed (which I have cut with a higher part to accommodate the cylinder) and also the frame. Another option would be to attach the tray and bed along the back of the truck with pieces of pipe cleaner or string. Please let me know if I can help any further. xo
April 30, 2014 at 12:23 pm
Hi Esther. I have published a post with a little more information on making a box dump truck here: https://keriene.wordpress.com/2014/04/30/box-dump-truck/.
July 10, 2014 at 10:45 pm
Wow! Simply beautiful and creative. Congrats! Do you happen to have a tutorial for the bulldozer? My little man is crazy for those.
July 16, 2014 at 1:11 pm
I’m glad you like them but I’m sorry to say that I do not have a tutorial for the bulldozer in particular. I would suggest using the tutorial for a car {https://keriene.wordpress.com/2013/08/27/car-box-tutorial-part-1-simple-car/} using the variations that are for the ambulance, delivery van or post van. Then add the details for a bulldozer. For tracks, you could use two portions of cardboard tube on each side, and use a strip of cardboard circling around these. For the blade, use two pieces of shaped cardboard on each side of the truck as arms, attached with split pins so that they are able to move. Join these arms with a blade, mine is simply a piece of cardboard curved a little and attached to the arms with tape. You may like to add other details like a safety light or exhaust pipe. I hope this helps but feel free to ask more questions. xo
July 29, 2015 at 2:01 am
Thank you so much. My son very love it. It’s amazing. xo
July 29, 2015 at 7:36 pm
So pleased to hear it. xo
September 12, 2017 at 3:10 am
Do you sell these?! If so I’d love to buy them from you!!
September 12, 2017 at 1:09 pm
That is very kind of you. No, I’m so sorry but I do not sell these. They are pretty easy to make, there are tutorial links at the top of the page. xo
August 19, 2018 at 11:07 pm
These are awesome. Would love to make the bull dozer for our childrens ministries. Could you send the instructions? Thank you!
August 20, 2018 at 8:15 pm
I’m glad you like them but I’m sorry to say that I do not have a tutorial for the bulldozer in particular. I would suggest using the tutorial for a car {https://keriene.wordpress.com/2013/08/27/car-box-tutorial-part-1-simple-car/} using the variations that are for the ambulance, delivery van or post van. Then add the details for a bulldozer. For tracks, you could use two portions of cardboard tube on each side, and use a strip of cardboard circling around these. For the blade, use two pieces of shaped cardboard on each side of the truck as arms, attached with split pins so that they are able to move. Join these arms with a blade, mine is simply a piece of cardboard curved a little and attached to the arms with tape. You may like to add other details like a safety light or exhaust pipe. I hope this helps but feel free to ask more questions. xo